
Why Reverse the Rose
Winning at radio orienteering often comes down to making fewer mistakes. One of the most common mistakes competitors make is when they get a bearing direction wrong. Errors in determining and plotting a bearing direction are easy to make, especially as fatigue sets in. So anything you can do to avoid bearing errors will pay you back handsomely in the form of consistently good results.
Step 1 is to mount your compass to your receiver. Not only does this (usually simple) step reduce the number of items you must carry in your hands, it also allows the compass to swing in unison with the receiver. If you mount your compass so it is horizontal and easily visible while holding the receiver, you can read directions directly from the compass as soon as the receiver has been rotated toward the null (or peak) heading direction. Easy peasy!
But wait, there’s more! If you reverse the numbering on your compass’ rose, the north-pointing needle will point precisely toward the numeral corresponding to the customary (clockwise increasing) bearing direction. You see, when you reverse the numbering on your compass, the reversed compass can function much like one of those automobile compass globes, which displays the heading of your car as you drive around corners. It might take some mind manipulation to convince yourself that this approach works, but trust me: it works. This approach has been used by radio orienteering champions for decades.
Why do this? It simplifies reading bearing directions by allowing you to simply note which number the red compass needle is pointing toward. No eyeballing the direction using a compass held in your hand or mounted to your map. No mental calculations. It is fast and easy to take bearings this way, and there’s little chance of making a mistake. Point, read, plot, and run!
Again, the steps are:
- Mount your compass horizontally on your receiver so that it can be easily read while turning the antenna. Adjust the compass’ dial so that the rose’s zero direction points toward the forward direction of the receiver (the direction toward the fox when you take a bearing).
- Reverse the direction of the numbers on the compass rose so that they increase in the counterclockwise direction (the reverse of a standard compass).
- Take bearings by simply pointing the antenna toward the fox and reading the number pointed to by the red compass needle.
Finding compasses with reversed roses is difficult. But you can transform almost any compass’ rose using a graphic overlay. Read on.
Apply a Label
The easiest way to reverse a compass’ rose is to apply a clear label. It is quite easy and inexpensive to order custom labels from companies such as StickerMule, and StickerApp, among many others. Very professional-looking results can be obtained using such labels. Here’s what the clear labels look like.
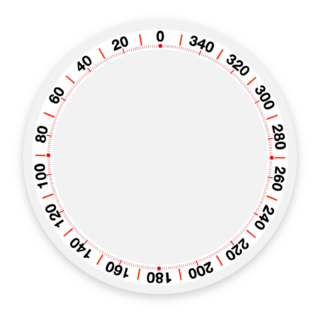
The labels are transparent, so cutting a hole in the center is unnecessary. Just peel, place, and press. The label helps protect the surface of the compass from scrapes and scratches. When the label eventually gets damaged, replace it with a new one. Labels are much cheaper to replace than compasses.
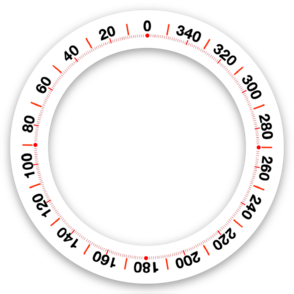
Note the terminology: what is shown above is a label, not a die-cut sticker. Die-cut stickers also work, but because they are not transparent, a hole must be cut in their center to make the compass needle visible. That works just fine but offers no protection to the compass surface and makes the sticker flimsy and difficult to apply precisely. But the die-cut stickers offer one advantage: the bright and opaque white background makes the numbering stand out better. Here’s what a die-cut sticker looks like:
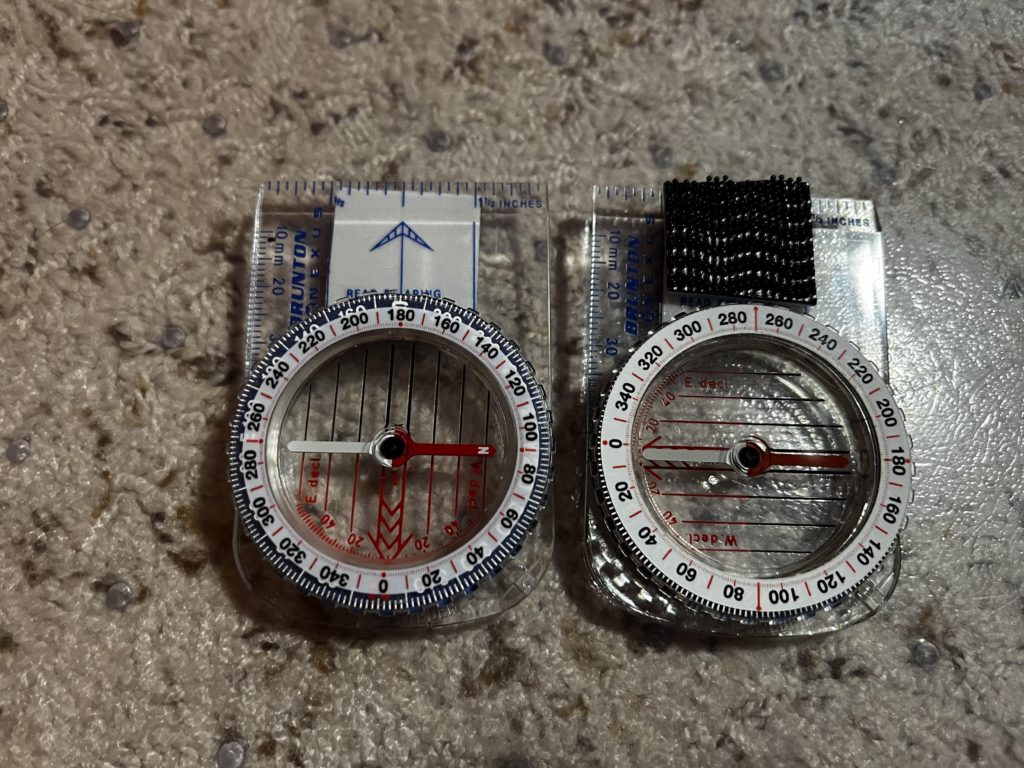
The image below shows what the final product can look like. A clear label has been applied to the compass on the left. A die-cut sticker has been applied to the compass on the right.
You will probably need only a small supply of labels (or stickers), so placing a small “sample” order can be an inexpensive way to obtain all the overlays you’re likely ever to need. Small sample orders generally cost about US$1 per label.
When ordering, you need to specify exactly what you want: circular transparent labels, or circular die-cut stickers, or whatever else you might choose. The diameter needs to be specified to match your compass. Carefully measure the diameter of your compass before ordering. Most compasses are either 1.9″ (48.3 mm) or 1.6″ (40.6 mm) in diameter.
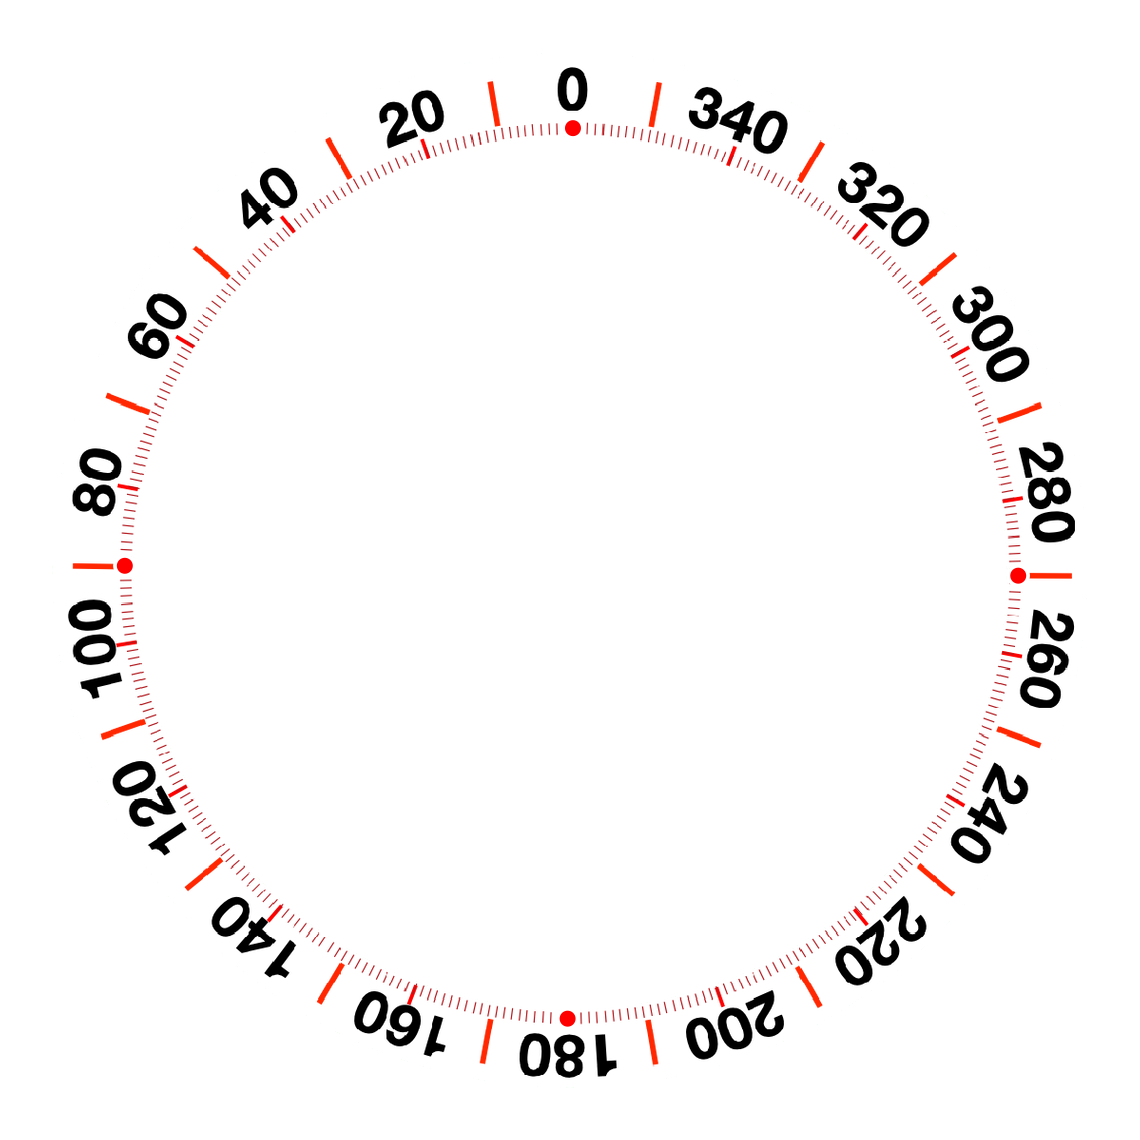
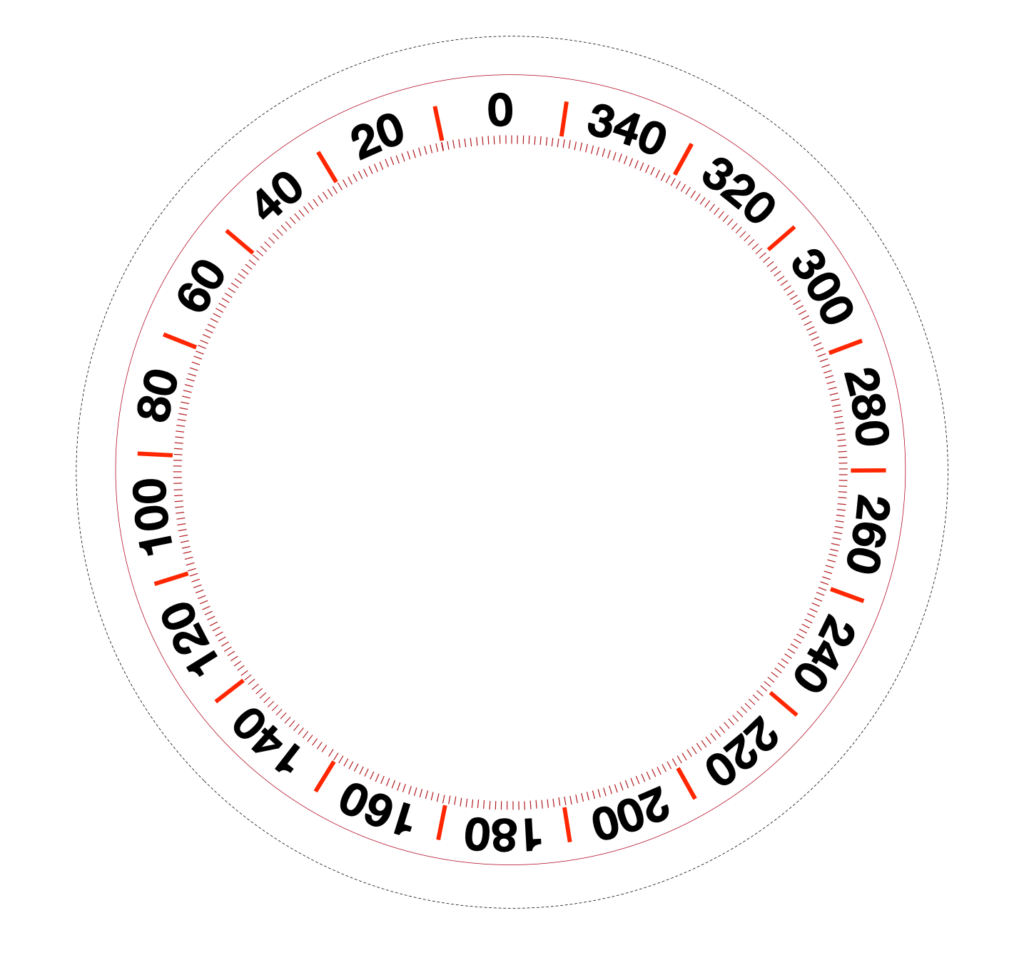
You don’t need to create your own graphics to submit for label printing. Feel free to use this one:
A reputable label printer will communicate with you before filling your order. Be sure that you communicate precisely what you want: a circular label (or sticker) with an outside diameter that matches your compass. You need a transparent circular label if no hole is cut in the center. If you want a sticker with a hole in the middle, let them know the diameter of the sticker and the diameter of the hole in the middle. If you need a lot of them, place a small sample order first to make sure you get what you want.
DIY Graphics
Below are some graphics files that can be useful for printing your own reverse compass roses for use in radio orienteering. Printing can be done on either an inkjet or a laser printer. Some resizing of the images might be necessary to accommodate compasses of various sizes. Adobe Acrobat Reader provides a “Custom Scale” setting when printing, allowing the right size to be determined using trial and error. An inexpensive inkjet printer is adequate for printing the compass rose, but laser printing should make the rose more water-resistant.
The compass rose below can be printed on white paper, then carefully cut out with scissors. The rose center should also be cut out with scissors (or an X-Acto knife) leaving a thin numbered washer-like disk (an annulus). Clear, wide, packing tape can then be used to adhere the compass rose to the face of the compass. A single layer of clear tape should cover the entire rose and compass face, helping protect the compass from scratches and the rose from moisture while allowing the compass’s needle to be seen. Ideally, the new compass rose should completely cover the compass’s original numbering so as to avoid confusion.
Below is an image showing what your compass should look like. Note the use of brass screws to mount the compass to the antenna boom. Always keep magnetic materials far from the compass. They can deflect the compass needle causing unacceptable bearing errors.
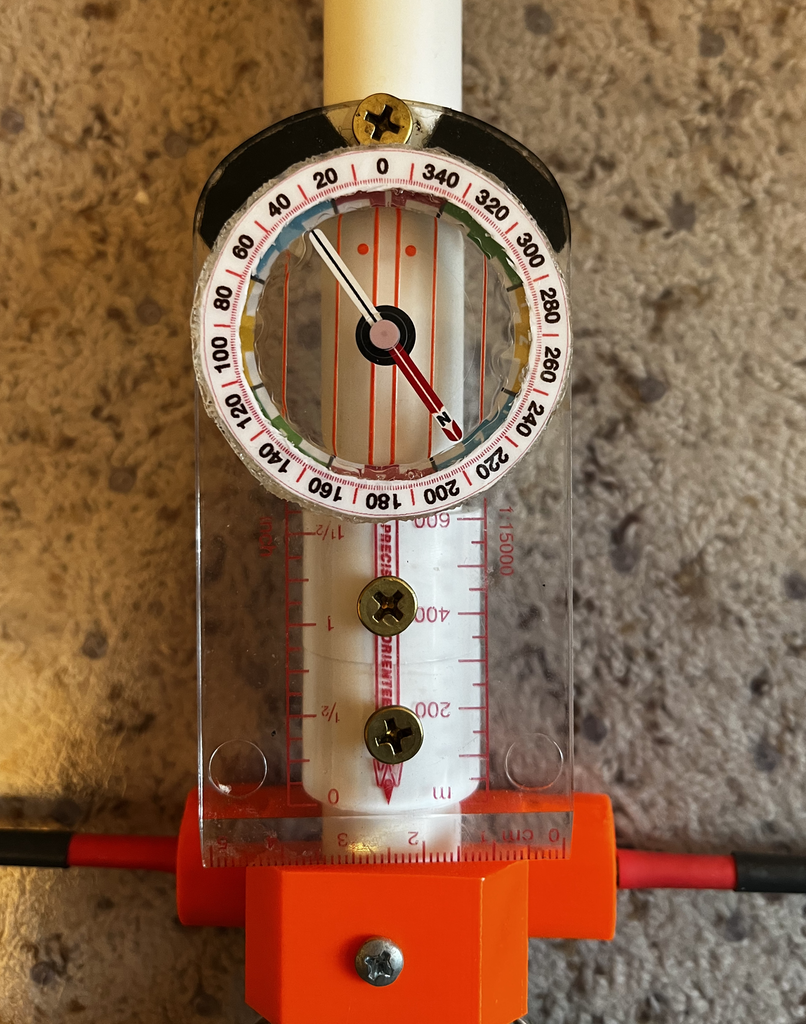
The compass shown above indicates that the forward direction of the antenna is pointing toward about 215 degrees magnetic.
Additional Reading
This section is optional. If it confuses you, please ignore it.
More ‘Splainin’
Still trying to wrap your head around why reversing the rose works? Perhaps holding a reversed-rose compass in your hands and playing with it will make things click. Or try the following explanation.
Another approach to explain the reverse-rose concept is to first look at how foot orienteers take bearings and compare that with how radio orienteers take bearings. For foot orienteers, I have shamelessly stolen the explanation from this website: http://www.learnorienteering.com/AdCompBearings.html)
How Foot Orienteers Take Bearings
Step 1 – Align the compass base plate along the line of travel. In this case, as illustrated on the left, your intended line of travel would be from the location of Control 9 to Control 10. Make sure that the red orienting arrow on your compass’ base is pointing in this direction.
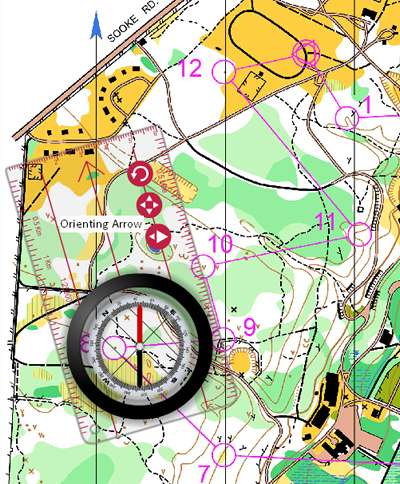
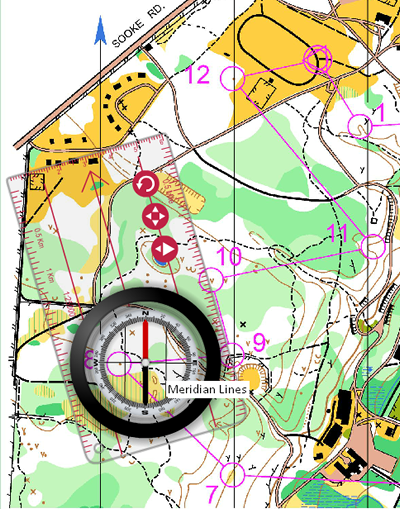
Step 2 – Rotate the compass dial until the meridian lines in the compass are in a parallel alignment to the north lines located on the orienteering map. You now have the bearing you need to follow, set on your compass ready to go.
Note: In this example, the compass needle is shown oriented north. However, when you are measuring your bearing, don’t focus on the needle. Just make sure to line up the meridian lines first.
Step 3 – Take your compass and rotate your body and your map so that the needle lines up with the orienting arrow. Look along the direction arrow to pick your target. You are now ready to head out on your compass bearing.
Now, let’s look at what we do in radio orienteering
Suppose we are standing at control 9 in the example above, and the fox is at control 10. Our receiver tells us the right direction to go, so we don’t need a compass for that. We only need the compass to tell us the bearing direction (in degrees) so that we can draw it correctly on our map. This is quite the opposite of foot orienteering. Foot orienteers want to use the compass to derive from the map what real-life direction they need to walk. Radio orienteers want to use the compass to derive from the direction they need to walk (provided by the receiver) the angular direction of a line they can draw on their map. So here is what radio orienteers need to do:
Step 1 – Align the compass baseplate toward a received signal. (If we mount the compass to our receiver with the baseplate aligned with the “forward” antenna direction, this step is handled automagically!) The images above correctly show how the baseplate is aligned in radio orienteering: parallel to the line between controls 9 and 10.
Step 2 – We want to determine the degrees (relative to magnetic north) of the direction that the baseplate (and signal) is pointing: that is our bearing. The compass needle is guaranteed to ALWAYS point toward magnetic north, so we could just count the number of degrees between the compass needle and the baseplate direction and we’d be done. But counting degrees is prone to error and a lot of work. So notice that the degrees are already enumerated, so we don’t need to count them, we can just read them off the compass dial. We rotate the compass dial until zero is pointing in the same direction as the baseplate/bearing, then we read the degress by simply looking at where the red compass needle is pointing. What could be easier?
But this is where we see a little problem. Imagine rotating the compass dial to align with the bearing direction in the pictures above. If you do that, the red compass needle will be pointing at approximately 25 degrees. But looking at the map, you can see that the actual bearing direction appears to be about 335 degrees (toward the north-northwest). Horrors: 25 versus 335 is an error of 50 degrees! But observe what happens if we reverse the direction of increasing numbers on the compass dial. If we reverse them so that they increase in the counterclockwise direction, the red compass needle would point toward about 335 degrees. Just what we want!
In summary: When radio orienteers take bearings, they are doing the reverse of foot orienteering, so they need the compass rose reversed too!
Another Approach: Why Not Simply Reverse How We Plot?
It might occur to you that one could use a standard compass rose and not reverse it. The numbers pointed to by the compass needle would be reversed from what we expect them to be. But they could be put right by reversing them after the fact: when we draw the bearings on our map.
Put another way, when plotting bearings on a map (or thinking about them in your mind) you could simply replace the standard clockwise-increasing direction paradigm with a counterclockwise-increasing paradigm. The effect would be identical to the reversed compass rose approach, but instead of reversing the rose of the compass, you would be reversing the direction of the reference frame for bearing directions. Once your mind adjusts to the new paradigm, you will not be prone to making mistakes. At least, so the theory goes.
The problem that some (most?) people will experience with this approach is that the rest of the world will continue to express bearing directions using the clockwise-increasing paradigm. That could prove confusing. I suspect that most of us will find reversing the compass rose the better approach.