
Overview
Teaching ARDF 101 is the first in a series of instructional guidance for ARDF instructors. This document presents a series of teaching methods, organized as a cohesive group of six lessons. It is designed to bring beginning radio direction finders from their first touch of an ARDF receiver, to independently hunting groups of foxes by the shortest route that they have determined using their own bearings.
This document is for teachers of ARDF. It conveys a methodology, providing sparing detail of how to implement its methods. That is by design. You should design your classes to take advantage of your strengths as a teacher to provide your students with the best learning experience possible.
Introduction
This document provides an effective approach for instructing newcomers to the sport of on-foot radio direction finding: a practical guide for introducing radio direction finding to the young and the young at heart.
Please refer to the Glossary to find definitions of italicized terms.
This step-by-step approach to teaching ARDF basics assumes little prior ARDF teaching experience. But there is an implicit assumption (made explicit here) that instructors have basic technical competency with orienteering, radio direction-finding, and ARDF hardware, and can effectively communicate their knowledge.
Readers should also be aware that in order to conduct these lessons at least one instructor (or helper) will need to be a licensed Radio Amateur. Federal Communications Commission regulations stipulate that only a properly-licensed Radio Amateur may control the transmitters. Also, someone must be available who is competent to maintain and repair transmitters, receivers, antennas, batteries, and all manner of equipment required for the sport. It should be apparent then that ARDF instruction is a multidisciplinary endeavor, best taken on by a cooperative partnership dedicated to the cause.
Because ARDF is a sport, and not just an academic exercise, it is appropriate to add endurance-building physical exercise routines to the training sessions. Physical fitness is not addressed in this document. Indeed all practice courses are intentionally short, and should not require more than mild exertion for the students to complete. But qualified instructors are encouraged to add exercise into the curriculum if doing so is deemed appropriate, and the students arrive to class aware and prepared for the experience.
It is likely that beginning instructors in IARU Region 2 will find unfamiliar many of the methods and exercises presented here. That is to be expected and is easily addressed if instructors will familiarize themselves with the lessons and exercises before attempting to present them. Instructor preparations should include practicing the lessons themselves using the same equipment that the students will be asked to use.
All the minutiae involved in conducting classes (e.g., obtaining suitable maps, registration of students, arranging for insurance, recording attendance, etc.) are outside the scope of this document.
About the Author
Nadia Scharlau is a two-time individual ARDF World Champion (W 80m 1984, W 80m 1992), and many-time Russian individual ARDF champion. Nadia also became the first USA team member ever to medal in the sport in a World Championships, taking home bronze for the USA at the 13th games in Primorsko Bulgaria (W35 80m 2006). Nadia spent 25 years deeply involved in one of the most successful ARDF programs in the history of the sport: Russian ARDF. Her career stretched from early indoctrination to paid professional, and instructor of Russian youth. Some of her former students continued in the sport with several qualifying for the Russian national team to compete in the World Championships – an extremely difficult achievement since the Russian team was so deep with talent that it was often more difficult make the Russian team than to medal at the World Championships! Nadia’s approach presented in this tutorial utilizes the methods and practices honed and proved over decades of use in Russia.
Equipment
Radio direction-finding requires equipment and quite a bit of it. Some of the equipment is relatively expensive (like receivers and transmitters) and some can be constructed inexpensively at home (like map holders and reverse-rose compasses). But aside from apparel that can be purchased from orienteering outfitters, most ARDF equipment is not available commercially and can be difficult to find. Although it is outside the scope of this document to provide sources of equipment, we will provide helpful URL links and construction projects in the appendices.
Reverse-rose Compasses
The lessons described in this document assume that all ARDF receivers are equipped with reverse-rose compasses. A reverse-rose compass attached correctly to a receiver simplifies the sport significantly by allowing bearings to be read directly from the compass dial and is generally the only type of compass used in ARDF. Reverse-rose compasses are nearly impossible to find outside of ARDF circles, but a standard orienteering compass can be readily modified to serve as a reverse-rose compass by replacing its standard compass rose with an overlay sporting reversed numbering. The compass modification procedure is easy enough to be accomplished by young ARDF trainees as a learning exercise. See the appendix for details.
Map Holders
The lessons described in this document assume that a map holder is available to each student as soon as maps are introduced in the lesson sequence. In the sport of ARDF a map holder is not a luxury, it is a necessity. A map holder not only frees students from having to dedicate a hand to carry the map (hands are a scarce commodity in this sport), it also serves as a platform for drawing straight bearings, protects the map from loss or damage, and supports an overlay that assists with drawing accurate bearings. Constructing a suitable map holder is easy enough to be accomplished by young ARDF trainees (with a little assistance) as a learning exercise. See the appendix for details.
Transmitters
Low-power transmitters (~100 mW) capable of continuously sending standard ARDF Morse code patterns are sufficient for these lessons. None of the lessons in the ARDF 101 lesson series uses transmitters sharing the same frequency or transmitting during specific time slots. Such “cycling” of transmitters is not needed to teach basic radio direction-finding skills, and would only add unnecessary and frustrating complexity to an already challenging learning regimen. All transmitters, not just the homing beacon, should operate continuously on unique non-interfering frequencies.
Each transmitter should operate continuously on its own unique non-interfering frequency.
On the subject of homing beacons, one is never used in this lesson sequence. There would be no harm in including a homing beacon, provided that its transmissions do not interfere with the lesson by desensitizing or overloading students’ receivers. Since the venues are assumed small enough for beginners to find their way back unassisted, and there is a risk of interference near the Start, it is generally better to dedicate the homing beacon frequency to an additional fox on the course.
Receivers
An individual receiver should be provided to each and every student. It is the only way to provide a complete learning experience to all. When the instructor demonstrates receiver operation, the students need to simultaneously control, touch, hear and fully experience it for themselves.
Receivers must be chosen to be compatible with the transmitters that will be used. That might seem obvious, but failure to have receivers and transmitters that operate on the same band would be a very costly mistake! Either of the popular radio bands (80 meters or 2 meters) is suitable for this instruction, so make your choice based on equipment cost, convenience, and availability.
Arrival Tokens
Arrival time registration systems, such as SPORTident, are unnecessary for beginners. Control arrival confirmation can be accomplished with small tokens (e.g., colored ribbons, key fobs, sticky notes, or tear-off strips of colored paper) placed at the controls, or using paper punch cards and punches hung from the flags. So skip the expense and hassle of electronic registration for beginners even if it is available to you.
Flags
Standard orienteering flags work best for visually marking the controls, and are readily available from orienteering equipment suppliers. Label each flag prominently with the number corresponding to the transmitter with which it is paired. Hang the flags from bushes or low tree branches, or use short posts as supports for hanging flags.
Venues
Beginning ARDF lessons should be conducted in a small park or woods. City parks and green spaces often make suitable practice locations. The area should be free of hazards and impossible to get lost in. Hills and other impediments to navigation should not be so severe as to pose significant barriers to the students. Ideally, there should be a large variety of places for locating foxes where they are not easily spotted from a distance.
Later lessons require sufficient space for multiple foxes to be arranged in various patterns. But the entire series of ARDF 101 lessons can be conducted in a moderate-size park of about 1 hectare (2.5 acres) provided there are sufficient trees, bushes, and trails to keep the courses interesting.
The entire series of ARDF 101 lessons can be conducted in a moderate-size park of about 1 hectare (2.5 acres)
Weather may not always cooperate with your lesson plans. Try to have an indoor (or at least protected) location available where group exercises can be conducted when it is too wet, too hot, or too cold outside.
Lessons
The lessons presented here were written with youth ARDF beginners (age 11 and up) in mind. Younger students can also be accommodated provided that they are able to grasp the lesson concepts and can carry the equipment safely. The lessons can be readily adapted and accelerated to accommodate adults and more experienced individuals.
The six lessons in the ARDF 101 teaching sequence were originally presented over a period of about six months of three-times-a-week classes, with class sessions lasting 90 to 120 minutes. The six months of classes included extended stretches of cold Russian weather that frequently kept students indoors doing studies similar to some of the exercises presented in the appendices. Depending on the climate where you live, you might find that your students can easily master all the outdoor lessons in far less time than the Russian winters would permit. In any case, the exercises are valuable for solidifying the concepts being taught, so intersperse exercises among the lessons for a change of pace even if the weather does not dictate you do so.
The lessons are presented in sequence, with the intent that students master each lesson’s skills before advancing to the next lesson. The skills being developed build on one another in a sequential approach that will help avoid student frustration. But improvisation and creative teaching methods are encouraged, and should be shared! Feel free to wing it from time to time, try new techniques, and share your discoveries in the comments section. Combining certain lessons into a single training session might make sense. Repeating lessons (using different course designs) to re-enforce skills is absolutely essential: you will need to learn to evaluate students’ levels of mastery of the material, then plan and pace the lessons accordingly.
The lessons are presented in sequence, with the intent that trainees master each lesson’s skills before advancing to the next lesson. You will need to evaluate student mastery of the material, and pace the lessons accordingly.
Training is best done with a group of six or more students, with an equal measure of boys and girls. Smaller groups can be good too, and one-on-one teaching is possible and in some cases is the best or only option, but having students interact as a group is important. Even a small group provides opportunities for competition, peer-assisted instruction, and cooperative group activities and team building. Too many students, especially for an inexperienced instructor, can make it difficult to maintain focus and provide the individual instruction that is usually required – so self-evaluate your herding abilities before deciding on maximum class size.
Even a small group provides opportunities for competition, peer-assisted instruction, and cooperative group activities and team building.
Minimize confusion: don’t add unnecessary complexity to these lessons. Review the lesson purpose and necessary equipment, and prepare ahead of time. Answer students’ questions, but avoid presenting more information than is required to address what is being asked – “We’ll cover that in Lesson 6” is an acceptable answer.
Lesson 1A – The Receiver and the Signal
Note: Lessons 1A and 1B will be reinforced continually by all subsequent lessons. A focused review of these lessons should occur only as needed.
Purpose
Get familiar with operating an ARDF receiver.
Equipment
For Each Student:
- One ARDF receiver.
The Practice Course:
- At least one fox sending continuous transmissions on a frequency for which the receivers are designed to operate; Any radio band may be utilized.
Preparation
Select a transmit power level and location for foxes so that the received signal strength is strong enough to be easily detected, and its direction can be readily determined from the location where instruction will take place.
Test all transmitters and receivers ahead of time to make sure they are working properly, and their batteries are fully charged. Have foxes actively transmitting before instruction begins.
Instruction
- Greet students and explain the lesson purpose using the most basic terminology. Answer any questions.
- Distribute ARDF receivers to the students.
- Instruct students on how to operate the essential receiver functions: turn it on, adjust volume and attenuation, tune to a signal, and determine the signal’s direction.
- Have students repeat the process several times by resetting the receiver settings, or having the student identify different foxes operating on different frequencies.
When to Proceed
Advance to the next part of this lesson when a student is comfortable holding the receiver, can operate the essential receiver features with little guidance, and has demonstrated the ability to determine the correct direction toward a fox.
Often it will be appropriate to conduct lessons 1A and 1B at the same training session.
Lesson 1B – Finding a Fox
Purpose
Gain familiarity and confidence with ARDF equipment by using an ARDF receiver to locate a fox.
Equipment
For Each Student:
- One ARDF receiver.
The Course:
- One fox transmitting continuously on a frequency for which the receivers are designed to operate.
(If available, consider using several foxes in different locations transmitting continuously on different non-interfering frequencies - this will allow repeating the instruction without having to relocate the fox.)
Preparation
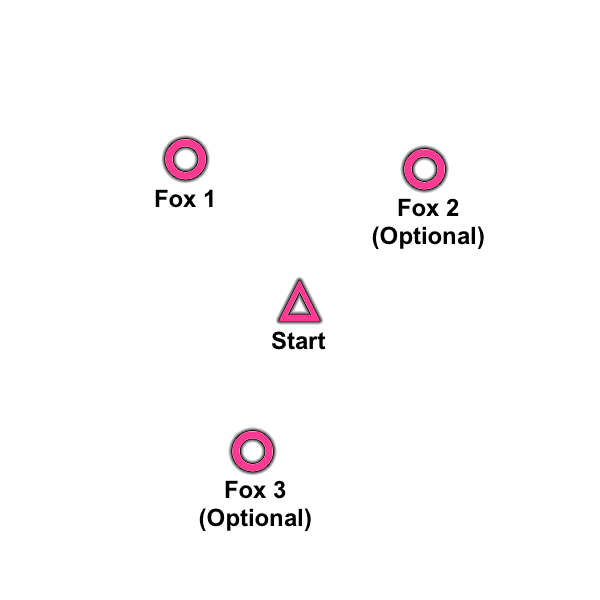
Taking into account the students’ ages and fitness levels, place foxes within an easy walking distance of the Start, and from one another. Make foxes easy to visually identify by placing a labeled orienteering flag near the antenna but not visible from the Start or from any position greater than about 30 meters (100 feet) away. An acceptable course arrangement is shown in the following diagram:
Test all transmitters and receivers ahead of time to make sure they are working properly, and their batteries are fully charged. Have foxes actively transmitting before instruction begins.
Instruction
- Greet students and explain the lesson purpose using the most basic terminology. Answer any questions.
- Distribute ARDF receivers to the students, and review Lesson 1A.
- Encourage students to find a fox by walking in its indicated direction while using the receiver for guidance.
- Accompany students along the walk to the fox. Answer any questions that come up; provide guidance and encouragement if a trainee veers too far off course.
- Congratulate students when the fox is located. The essence of the sport has been accomplished, and it didn’t take very long at all. Good job!
- Have the students practice registering their arrival by taking a token or punching their punch card.
- Repeat, starting with step 2 using a different fox location, giving students an opportunity to identify and correct their own mistakes with less guidance.
Reinforcement: Group Relay Exercise
- Place two foxes (#1 and #2) a short sprint away from the Start and just out of sight. Try to keep the placements short and simple enough that all students can find a fox and return with a token with little difficulty.
- Divide the trainees into two teams: A and B; and have them queue up in starting order.
- Start the clock and send the first competitor from each team out to find different foxes: A finds #1, B finds #2.
- When competitors return (carrying a token or not) they turn in their token or punch card and go straight to the finish area away from the starters, and the next relay teammate on that team starts.
- The relay race continues until both teams have all their members in the Finish area. The winner is the team that has collected the most tokens, and if both teams were equally successful then the winner is decided by shortest time.
- Repeat the relay exercise, this time with the teams locating the opposite fox.
When to Proceed
Repeat this lesson using a variety of fox locations until students can consistently locate a single fox without assistance, then proceed to the next lesson.
Lesson 2 – Finding Multiple Foxes
Note: Lesson 2 will be reinforced continually by all subsequent lessons. A focused review of this lesson should occur only as needed.
Purpose
Learn to find multiple foxes in sequence
Equipment
For Each Student:
- One ARDF receiver.
The Course:
- Three or more foxes transmitting continuously on different non-interfering frequencies. In addition to operating on different frequencies, foxes should identify using a unique Morse code pattern (MOE, MOI, etc.) as is traditional in ARDF.
Preparation
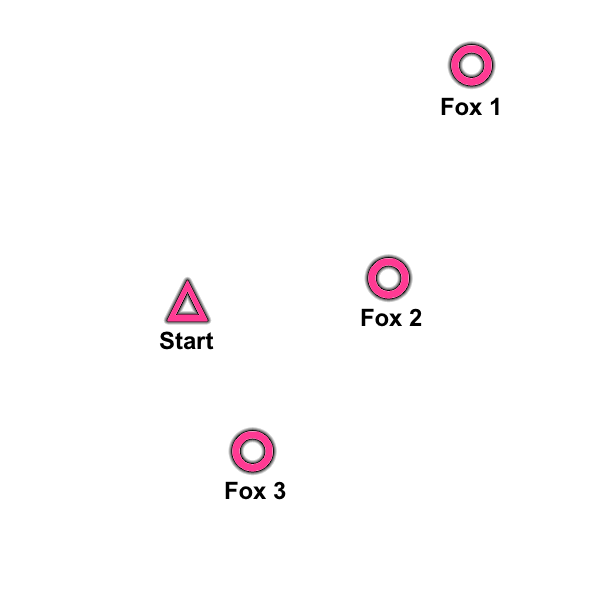
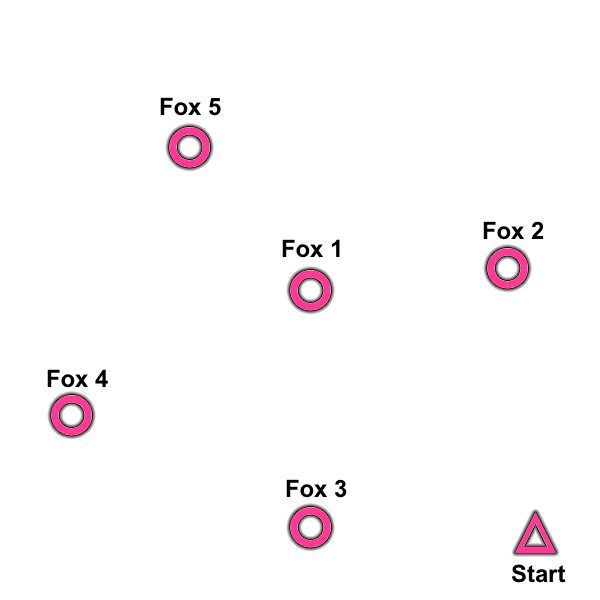
Taking into account the students’ ages and fitness levels, place all foxes within an easy walking distance of the Start, and from one another, but far enough apart to not be visible from the Start or from one another. Place the foxes in positions similar to the following diagram, ensuring that each fox exhibits a distinctly different bearing angle and signal strength at the Start:
Test the transmitters and receivers ahead of time to make sure they are working properly, and their batteries are fully charged. Have foxes actively transmitting before instruction begins.
Instruction
- Greet the students, review the previous lesson, and explain this lesson’s purpose using the most basic terminology. Answer any questions.
- Instruct the students to tune to each of the foxes, note their Morse code patterns, the strengths of the signals, and their indicated directions from the Start.
- Discuss the different properties of the signals and what they imply about each fox: its distance from the Start, and the direction in which it lies.
- Instruct students to tune to Fox #1.
- Encourage students to find the fox by walking in its indicated direction while using their receivers for guidance. Accompany the students along the walk, providing assistance only as needed.
- When the fox is located, instruct the students to tune to the next fox, and repeat steps 5-6 until all foxes have been located.
Reinforcement: Group Relay Exercise
- Place three or more foxes (#1, #2 and #3) a short sprint away from the Start and out of sight from the Start and from one another. Try to keep the placements short and simple enough that all students can find the foxes and return with little difficulty.
- Divide the trainees into two teams: A and B; and have the students queue up in starting order
- Start the clock and send the first competitor from each team out to find two different foxes: A finds #1 then #2, B finds #3 then #2.
- When a competitor returns (carrying tokens or not) they submit their tokens to the instructor and go straight to the finish area away from the starters; then the next relay teammate starts.
- The relay continues until both teams have all their members in the finish area. The winner is the team that has collected the most tokens, and if both teams were equally successful then the winner is decided by shortest time.
- Repeat the relay exercise, this time with the teams finding the opposite pair of foxes.
When to Proceed
Repeat this lesson using different fox locations until students can consistently locate a series of foxes without assistance, then proceed to the next lesson.
Lesson 3 – Choosing the Shortest Route
Note: This lesson should be repeated over several training sessions using a variety of course designs, while providing progressively less assistance to the students. Intersperse exercises and competitions between the repeated lessons to keep things interesting.
Purpose
Learn to determine the shortest route to follow.
Equipment
For Each Student:
- One ARDF receiver.
- One paper copy of the diagram below (or one of your own design)
- One sharpened pencil with eraser.
- A ruler.
The Course:
- Three or more foxes transmitting continuously on different non-interfering frequencies. In addition to operating on different frequencies, foxes should identify using a unique Morse code pattern (MOE, MOI, etc.) as is traditional in ARDF.
Preparation
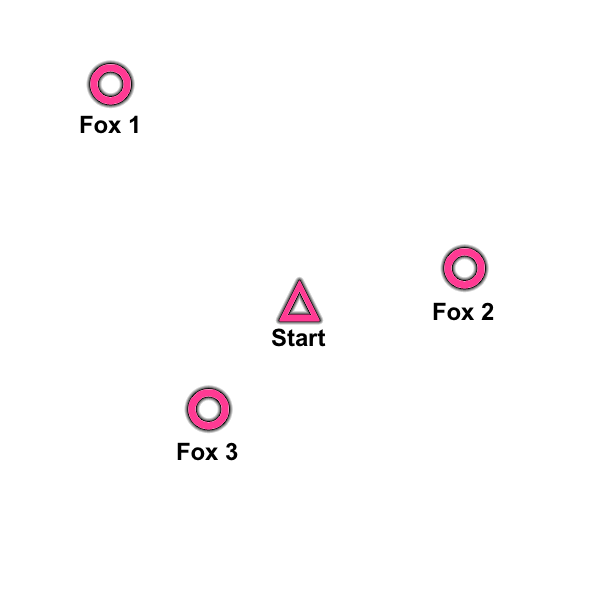
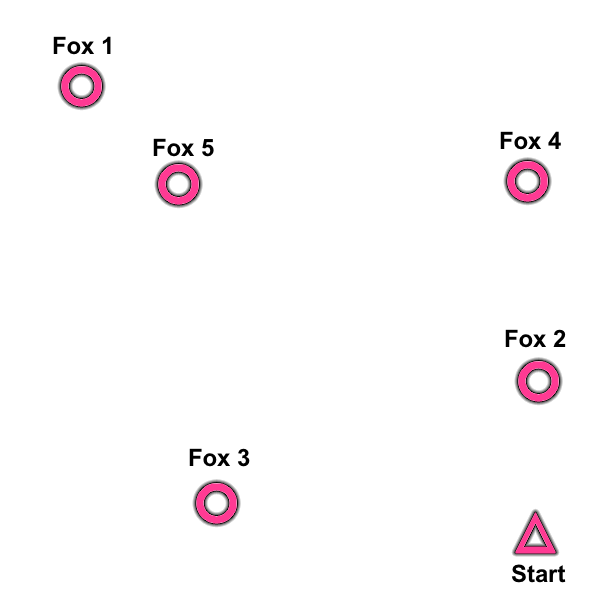
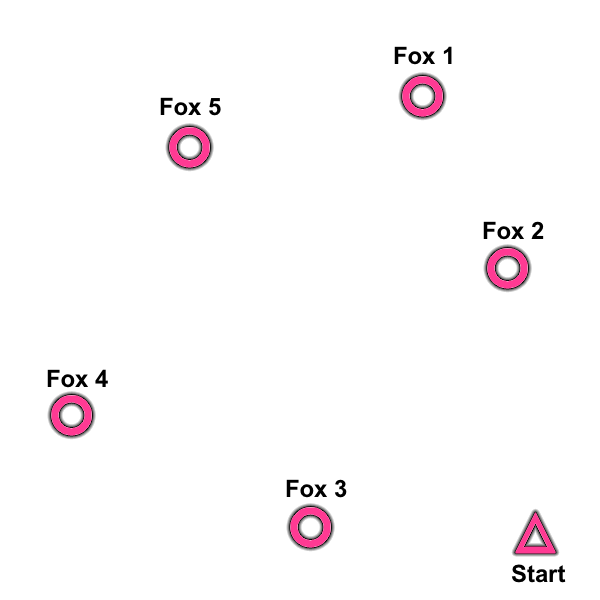
Taking into account the students’ ages and fitness levels, place all foxes within an easy walking distance of the Start, and from one another, but far enough apart to not be visible from the Start or from one another. Arrange foxes similarly to the following diagram so that the shortest route is S-2-1-3-S or S-3-1-2-S:

Test transmitters and receivers ahead of time to make sure they are all working properly and their batteries are fully charged. Have foxes actively transmitting before instruction begins.
Instruction
- Greet students, review the previous lesson and explain this lesson’s purpose using the most basic terminology. Answer any questions.
- Distribute receivers and instruct students to tune to the continuously-transmitting foxes, and determine their indicated directions from the Start.
- Discuss the different properties of the signals they hear and what those properties indicate about the foxes: their directions and distances from the Start. Guide students’ thinking about the importance of the order in which foxes are found.
- Provide students with a printout of the course diagram and have them measure with a ruler the straight-line distances along the various possible orders for finding the foxes and returning to the Start. Have them measure each leg along the route and add them all together to calculate each route’s total distance. Then examine the results. A gold star goes to the first student to realize that there are in fact two identically-short routes going in opposite directions.
- Having all agreed on the shortest route, instruct students to tune to the first fox to be found.
- Encourage students to find the fox by walking in its indicated direction. Accompany them along the walk, providing assistance only as needed.
- When the fox is found, instruct the students to tune to the next fox, and repeat steps 6-7 until all foxes have been located following the shortest route.
Reinforcement: Group Relay Exercise
- Place three or more foxes (#1, #2 and #3) a short sprint away from the Start and just out of sight from the Start and from one another. Try to keep the placements short and simple enough that all students can find the foxes and return with little difficulty.
- Divide the trainees into two teams: A and B; and have them queue up in starting order
- Start the clock and send the first competitor from each team out to find all three foxes: one team finds the foxes in optimum order, and the other team finds them in reverse optimum order: e.g., A finds #2 then #1 then #3; B finds #3 then #1 then #2.
- When a competitor returns (carrying tokens or not) they submit any tokens to the instructor and go straight to the finish area away from the starters; then the next relay teammate starts.
- The relay continues until both teams have all their members in the finish area. The winning team is the one that collects the most tokens, and if both teams were equally successful then the winner is decided by the shortest time to finish.
- Repeat the relay exercise, this time with the teams finding foxes in the opposite order.
When to Proceed
Repeat this lesson over several training sessions using different course designs of increasing difficulty until students can consistently identify the optimum order for finding at least three foxes, and demonstrate the ability to locate foxes in order without assistance. Then proceed to the next lesson.
Lesson 4 -The Map, the Compass, and a Bearing
Note: This lesson should be repeated over several training sessions, using a variety of course designs of increasing size and difficulty, while providing progressively less assistance to the students. Intersperse exercises and competitions between the repeated lessons to keep things interesting.
Purpose
Learn how to read and draw a bearing on a map.
Equipment
For Each Student:
- One ARDF receiver with attached ARDF reverse-rose compass.
- An accurate scale orienteering-style map (e.g., 1:5000 or 1:2500) of the area where training will take place.
- One map holder.
- One grease pencil or other suitable marker for drawing bearings on the map holder surface.
The Course:
- Three or more foxes transmitting continuously on different non-interfering frequencies. In addition to operating on different frequencies, foxes should identify using a unique Morse code pattern (MOE, MOI, etc.) as is traditional in ARDF.
Preparation
Taking into account the students’ ages and fitness levels, place all foxes within an easy walking distance of the Start, and from one another, but far enough apart to not be visible from the Start or from one another. Arrange foxes so that they are all in obviously different directions from the Start, similar to the following diagram:
Mark the Start location on each student’s map. The Start is also the location where this lesson should be conducted.
Instruction
- Greet the students, review the previous lesson, and explain this lesson’s purpose using the most basic terminology. Answer any questions.
- Distribute receivers (with attached compasses), map holders, and maps to the trainees.
- Demonstrate how to install the maps into the map holders, and attach the map holder to the arm.
- Instruct the students to tune their radios to the first fox, and demonstrate how to read its bearing angle shown by the compass.
- Using the bearing-guide overlay to guide the pen along the correct angle, have students draw a straight line from the Start location in the bearing direction read from the compass. Ensure bearings extend to the edge of the map.
- Discuss how an accurately-drawn bearing line transfers the receiver’s bearing information to the map, with the bearing line passing through all the places on the map where the receiver indicates that the fox might be located.
- Have the trainees repeat steps 5 and 6 for the other foxes.
Reinforcement: Group Relay Exercise
Have the trainees divide into teams and repeat the relay exercise from the previous lesson, leaving the fox placement the same as used for this instruction.
When to Proceed
Repeat this lesson until students can independently read and draw reasonably accurate bearings on their maps. Then proceed to Lesson 5.
Lesson 5-Multiple Bearings
Note: This lesson in particular should be repeated over a period of weeks, using a variety of course designs of increasing size and difficulty, while providing progressively less assistance to the students. Intersperse exercises and competitions with the repeated lessons to keep things interesting.
Purpose
Use multiple bearings to estimate a fox’s location on a map.
Equipment
For Each Student:
- One ARDF receiver with attached ARDF reverse-rose compass.
- An accurate scale orienteering-style map (e.g., 1:5000 or 1:2500) of the area where training will take place.
- One map holder.
- One grease pencil or other suitable marker for drawing bearings on the map holder surface.
The Course:

- Three or more foxes transmitting continuously on different non-interfering frequencies. In addition to operating on different frequencies, foxes should identify using a unique Morse code pattern (MOE, MOI, etc.) as is traditional in ARDF.
Preparation
Taking into account the students’ ages and fitness levels, place all foxes within an easy walking distance of the Start and from one another, but far enough apart to not be visible from the Start or from one another.
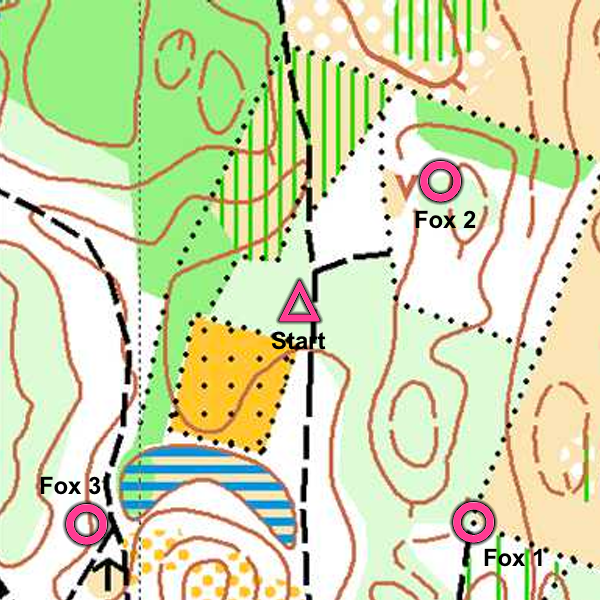
Arrange foxes in a similar arrangement to the following diagram, placing them near obvious map features much as might be done for an “orange” orienteering course. Fox 1 is at the end of a trail and near a vegetation boundary corner, Fox 2 is next to a pit, and Fox 3 is next to a trail crossing:
Mark the Start location on each map. The Start is also the location where this lesson should commence.
Instruction
- Greet the students, review the previous lesson, and explain this lesson’s purpose using the most basic terminology. Answer any questions.
- Distribute receivers (with attached compasses), map holders, and maps to the trainees.
- Repeat the previous lesson, providing assistance only as necessary. Confirm that all students have successfully placed a reasonably accurate bearing from the Start toward each fox before continuing to the next step. Ensure that bearing lines are drawn to the edge of the map.
- Move as a group to a location 200-300 meters from the Start where an obvious map feature is located. Accompany the students there, and help them identify map features that are visible along the way.
- Upon arriving at the new location, have the students place a small mark on their maps at the new location.
- Have students repeat the bearing-drawing lesson, drawing their bearing lines to pass through their new location. Ensure bearings extend to the edge of the map.
- Have students examine and compare their plotted bearings. Emphasize to them the significance of bearing lines that cross, and what it implies about the likely location of the fox.
- If it seems appropriate based on the students’ results, repeat steps 4-7 for a third location.
- Have the students walk as a group to visit a fox. Upon arrival have the students examine the map features to determine the true location of the fox on their maps. Have the students compare the fox’s true map location with its bearings crossing point. Are they the same? What might have caused any error? What makes a bearing helpful other than just being accurate (i.e., avoid collinear bearings)?
- Repeat the previous step for all the foxes.
Reinforcement: Bearing-Taking Competition
- Carefully place one or more foxes at locations you can precisely identify on the map. The locations should be out of sight but close enough to the Start that a short walk will result in an obvious change in bearing angle.
- Instruct students to take careful bearings toward the foxes from several specific locations.
- Compare the students’ bearings results with the actual fox location. Award prizes based on bearings crossings coming closest to the actual fox locations.
- If time allows, a relay competition can be held once the bearing competition is complete – allowing the fox placement to serve double duty, and allowing students to visit the location(s) their bearings identified.
When to Proceed
Repeat this lesson over multiple training sessions using a variety of course designs. Proceed to Lesson 6 when students can consistently select reasonable locations for taking multiple bearings toward a fox, and can consistently navigate to the vicinity of bearing crossing locations with the help of an orienteering map.
Lesson 6 – Map & Fox Practice
Note: Students at this point in the course are exercising all the basic skills required for ARDF. This lesson should be repeated many times, with a variety of course designs of increasing size and difficulty. Intersperse exercises and competitions with the repeated lessons to keep things interesting.
Purpose
Learn to keep track of your location on a map while navigating an ARDF course.
Equipment
For Each Student:
- One ARDF receiver with attached ARDF reverse-rose compass.
- An accurate scale orienteering-style map (e.g., 1:5000 or 1:2500) of the area where training will take place.
- One map holder.
- One grease pencil or other suitable marker for drawing bearings on the map holder surface.
The Course:
- Three or more foxes transmitting continuously on different non-interfering frequencies. In addition to operating on different frequencies, foxes should identify using a unique Morse code pattern (MOE, MOI, etc.) as is traditional in ARDF.
Preparation
Taking into account the students’ ages and fitness levels, place all foxes within an easy walking distance of the Start, and from one another, but far enough apart to not be visible from the Start or from one another. Arrange foxes similarly to one of the diagrams provided in the appendix.
Instruction
- Greet the students, review the previous lesson, and explain this lesson’s purpose using the most basic terminology. Answer any questions.
- Distribute receivers (with attached compasses), map holders, and maps to the trainees.
- Instruct the students to draw bearing lines from the Start toward each of the foxes.
- Based on their bearings, and fox signal strengths, guide the students to form a hypothesis about the optimum order to find the foxes. If there is not full agreement, take a vote on which order to try.
- Move as a group toward the first fox in the preferred order. Remind the students to keep track of their location by observing features as they go. Before reaching the first fox, prompt the students to select at least one location on their way at which they take additional bearings toward all foxes. Are they still happy with their optimum order hypothesis? If the vote is “no”, then vote on a new order.
- After arriving at the fox, have the students take another set of bearings toward the remaining foxes. Are they still happy with their optimum order hypothesis? If the vote is “no”, then vote on a new order.
- Move as a group toward the next fox in the preferred order. Remind the students to keep track of their map location by observing features as they go. If appropriate, prompt the students to select a location on their way at which they take additional bearings toward all remaining foxes.
- Repeat steps 6 and 7 until all foxes have been located. Then return to the Start.
- In a relaxed atmosphere (read that “soft drinks and snacks”), examine all the maps and the bearings taken by each student. Use questions to prompt each student, in turn, to describe their experience from start to finish. Did they agree with the first hypothesis? If not, why not? What were their thoughts upon arriving at the first fox? Did they change their hypothesis during the lesson? If so, why? What might they have done differently to avoid any mistakes?
Reinforcement: Individual Competitions
- Once students can independently navigate these courses by map and receiver, they are able to participate in simplified individual competitions.
- Set up a course of three or more foxes with an appropriate level of difficulty.
- Randomize the starting order and send the student competitors out one by one, a minute apart.
- Record the students’ start and finish times, and post their fox totals and times as they return from the course.
- Declare the winner and recognize the top three finishers.
When to Proceed
Repeat this lesson over a period of weeks using a variety of course designs, until students can consistently complete courses without assistance, and they demonstrate an ability to analyze their mistakes. At the completion of this lesson, a student is prepared for graduation. A celebration and certificates are in order!
Glossary
Antenna – A device designed to radiate or receive radio signals.
ARDF – Amateur Radio Direction Finding – an international radiosport promoted by the International Amateur Radio Union.
ARDF Course – The Start, Finish, all Controls, and the geographical terrain around them, toward and through which an ARDF competitor must navigate. See also course map.
ARDF Championship – A sanctioned ARDF competition held for the purpose of determining one or more ARDF champions in one or more age/gender or team categories.
ARDF Competition – One or a series of ARDF events held for the purpose of determining one or more winning contestants. ARDF Competitions might be held over a period of one or more days. Differs from ARDF practices, which are training exercises that might not be competitive in nature.
ARDF Event – A single ARDF contest type held on a particular course over a certain period of time. “2m Classic” and “80m Sprint” are two examples of an ARDF event. Compare with ARDF Competition.
Bearing – The compass direction toward a fox as indicated by a receiver, and the location from which the direction was determined. An angle without an associated location is just a number, not a bearing. ARDF bearings are always given using degrees magnetic; that is, simply the direction indicated by a magnetic compass with no corrections applied.
Compass Rose – A circular numbered scale (usually with 36 points of 10° markings) numbered clockwise around a compass dial. Compare with reverse rose.
Control – A geographic location, usually identified by an obvious flag, toward which an ARDF competitor seeks to navigate. Compare with Fox.
Control Point – The precise location of a control.
Course – see ARDF Course.
Course Map – A map often used to define the boundaries, and provide navigational guidance, for a specific ARDF course. Course maps generally identify the Start, the Finish, and any excluded areas for the course.
Directional Antenna – An antenna designed to receive or transmit radio signals preferentially (more strongly or more weakly) in a specific direction or pattern of directions.
Feature – An identifiable object that is depicted on a map. E.g., a large boulder, a road, a stream, etc.
Finish – The last location that a competitor must find in order to complete an ARDF course.
Flag – A 3-dimensional orange-and-white cloth banner similar to those used in the sport of orienteering, that is placed in the vicinity of a fox.
Fox – A radio station placed near a control point.
Homing Beacon – A transmitter placed at or near the Finish, that transmits continuously on its own unique non-interfering frequency. A homing beacon provides a constant signal that assists with navigation to the Finish.
Magnetic North – North as indicated by the Earth’s magnetic field. The direction pointed to by a magnetic compass needle.
Map – A scale diagram representing a geographic region, its terrain, and features. Maps used in ARDF are always oriented with magnetic north up, i.e., toward the top of the map.
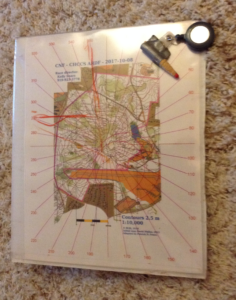
Map Holder – A small flat platform attached to the forearm, designed to provide convenience while carrying a map.
Morse Code Pattern – A series of long and short tones, sent repeatedly, used to uniquely identify a fox while listening to it with a receiver. ARDF often utilizes a simple tone pattern that allows the listener to identify a fox by simply counting the number of dits (short tones) that are heard.
Omnidirectional Antenna – An antenna designed to transmit or receive radio signals uniformly, without exhibiting a preferential (stronger or weaker) direction.
Radio Amateur – A ham radio operator. An individual authorized to operate radio transmitters on frequencies allocated for use by the Amateur Radio Service.
Radio Band – A range of radio frequencies usually identified by its approximate wavelength in meters. ARDF most often utilizes either of two Amateur Radio Service radio bands: 2 meters (144 MHz – 148 MHz), and 80 meters (3.5 MHz – 4 MHz).
Radio Direction Finding – The practice of determining the direction toward the source of a radio signal.
Radio Station – A transmitter and its antenna.
Radio Signal – An emission of electromagnetic energy detectable by a receiver coming from a transmitter’s antenna.
Receiver – A device used to detect the presence of a radio signal. Often receiver is used to refer to both a receiver and its associated directional antenna.
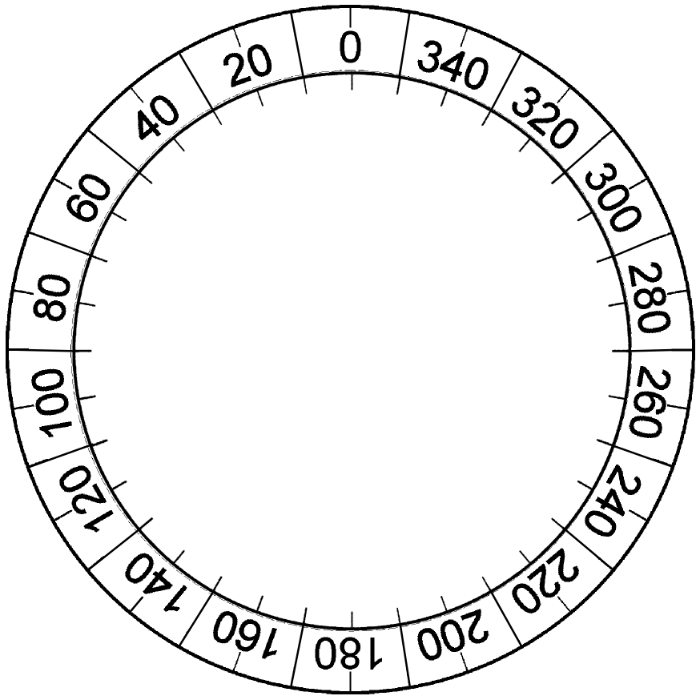
Reverse Rose – A circular numbered scale (usually with 36 points of 10° markings) numbered counter-clockwise around a compass dial. A reverse rose compass, attached to a directional antenna so that zero corresponds to the direction toward a signal source, allows bearings to be read by simply observing the scale reading indicated by the compass needle. Compare with compass rose.
Start – The location from which competitors commence on an ARDF course.
Time-Registering Device – A small device carried (or worn) by ARDF competitors that records their official start, finish and arrival times at each control.
Token – In the context of these lessons a token is an object placed at a control, and which is taken to present as proof that the control was visited.
Transmitter – A device designed to generate radio signals.
Appendix A – Equipment
Transmitter Requirements
Receiver Requirements
[TODO: Provide helpful links to ARDF and orienteering equipment sources.]
[TODO: Provide guidance on proper use of the equipment, such as how to use the bearing grid overlay lines to draw a bearing.]
Appendix B – Setting Up Controls

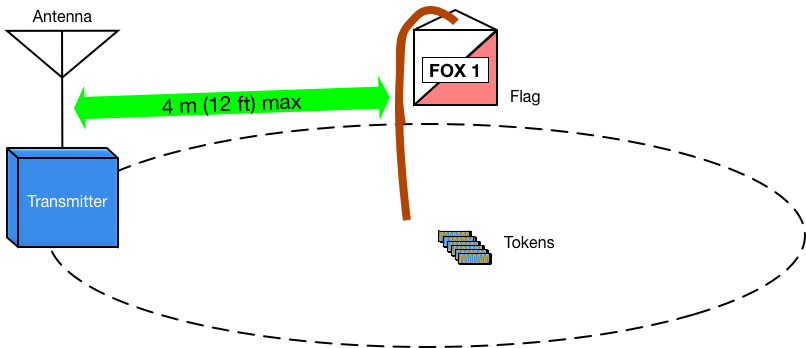 Controls for these lessons consist of a fox (transmitter and antenna), a flag, and arrival confirmation tokens. The flag and the fox should be placed within 4 meters (12 feet) of one another, and the flag should be plainly visible when standing near the antenna. Try to avoid having flags visible from the Start, or from positions much greater than about 10 meters (30 feet) away from the flag. The fox number (“1” for MOE, “2” for MOI, etc) should be displayed prominently on the flag marking each fox.
Foxes should all transmit continuously on different non-interfering frequencies. Foxes should identify using a unique Morse code pattern (MOE, MOI, etc.) as is traditional in ARDF. All foxes must operate on the same radio band as the receivers that will be used to find them.
Appendix C – Venues & Course Setup
[TODO: Provide tips for selecting a suitable venue and setting up a course.]
Safety, safety, safety!
Need a map of the venue.
Parks, green spaces, woods, and forests…
80m: Avoid overhead wires, railroad tracks, underground pipes…
2m: Avoid large metal objects, fences, radio, cellular and television towers…
Appendix D – Exercises
[TODO: Provide a generous number of helpful exercises that solidify lesson concepts.]
Exercise 1: Build a map holder
Visit this site for instructions on building functional map holders and bearing-guideline overlays. Students are likely to need some assistance with properly installing snaps, and putting everything together properly. Build at least one map holder for yourself ahead of time, then provide your map holder as an example for the students to duplicate.
Exercise 2: Build a reverse-rose compass
Visit this site for instructions for creating reverse roses for overlaying on top of standard compasses. Print out enough roses for all the students, provide them with some scissors and clear packing tape, and let them go to town. It is easy to mess up on the first few attempts, so be sure to have plenty of spare printouts and tape.
Once a compass has had its rose converted to reverse numbering, then it is time to mount the compass semi-permanently to the receiver. Depending on the design of the receiver housing, that might be as simple as applying some hot glue to affix the compass in place. Or it might require constructing a platform to hold the compass horizontally, and attaching the platform to the receiver housing.
Two things to watch out for:
1) Test whether bringing the compass in close proximity to the receiver causes the compass needle to deflect. If so, it might be necessary to use an extended platform that displaces the compass away from the receiver by several centimeters to avoid introducing bearing error.
2) Be sure that the compass gets mounted so that the zero compass direction is oriented in the receiver’s direction to the fox. Fortunately, most compasses allow their faces to be rotated relative to the needle, thereby allowing you to do this “calibration” after the compass housing has been affixed to the receiver.
Exercise 3: Vocabulary – Memorizing the Glossary Terms
Hold informal pop quizzes to motivate students to learn ARDF vernacular. Consider providing rewards for perfect scores.
Exercise 4: Map Jig-Saw Puzzle
Cut up several ARDF maps into suitably small irregular pieces, each piece containing features or parts of features. Divide the students into teams. Give each team a diced map, and each student a symbol legend identifying the names of orienteering map symbols. Have each team work together to piece one of the maps together. A prize goes to the first team to complete the task.
This task helps students develop familiarity with map symbols and their names. To cooperate effectively on putting a map back together, the students must communicate what is contained on the map pieces they are examining. That communication goes best if everyone uses the same names. Students will learn the symbols and their names almost by osmosis if they are sufficiently motivated by the competition.
Exercise 5: Relay Races
Exercise 6: Individual Races
Exercise 7: Bearing Accuracy Competition
Exercise 8: Orienteering map reading – symbols, etc.
Exercise 9: Field trip – Go visit a regulation ARDF event
Appendix E – Suggested Course Designs
[TODO: Provide diagrams, of course, fox arrangements to help develop ARDF skills, primarily for use in repetitions of the final lesson.]
The following course patterns are intended to help students learn and sharpen their bearing-taking and route-selection skills. Pay attention to both the relative locations and the fox numbering indicated in each diagram. Alter them as you see fit, but be sure to carefully analyze your exact course design ahead of time, so that you can knowledgeably discuss with your students the advantages and drawbacks of decisions they made (or could have made) during practice.
Note that you can transform any of these courses by rotating or moving them while keeping the foxes in the same positions relative to one another. The Fox numbering can likewise be changed. Transforming the courses in such a manner creates “new” and different courses from the perspective of the students. You should repeat these patterns many times using transforms.
If you do not have enough fox transmitters to create a particular course, use what you’ve got to approximate a similar learning experience.
Colinear Bearings Practice

Choosing a Route with Aligned Foxes
Domino Pattern with Start Outside
Circular Pattern with Start Outside
Appendix F – Where to Find Interested Students
[TODO: Examine the system that worked in Russia, and consider how to find or create a working system here.]